Customizing LibreOffice for Feedback on Students' Work
Giving feedback online has many advantages and one disadvantage: time. If you just use the tools in a standard word processor, it can take much longer to give feedback electonically than by hand. What follows is a guide to customising your word processor using templates, macros and autotext. I wrote it for LibreOffice and OpenOffice.org, but it would probably work, with a few adaptations, with Microsoft Word. (Note: the screenshots here are from OpenOffice.org, but they are almost identical to LibreOffice.)
Templates
Templates are useful for students and teachers alike, and it is worth preparing two templates, one for student work and one for teacher feedback. The first is a simple essay template, so that students do not need to worry about formatting details, and you are spared essays written entirely in bold 18pt Comic Sans Serif. If you are teaching students who have particular academic or professional requirements, it is worth checking what these are and incorporating them (e.g., business people may need to write letters or reports with a certain layout, while psychology students will need to submit papers in APA format); otherwise, it is enough to pick fonts, margins etc. that are soothing to the eye.
 |
The template for feedback contains a section for your overall comments and a key to whatever error code you decide to use. For example, I use blue highlighting for grammar errors, yellow highlighting for spelling mistakes, a caret symbol for missing words and so forth. When students submit work, you can then simply copy it into your feedback template and save it as the document you will send back to the student.
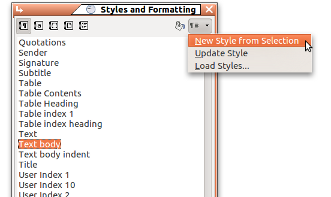 |
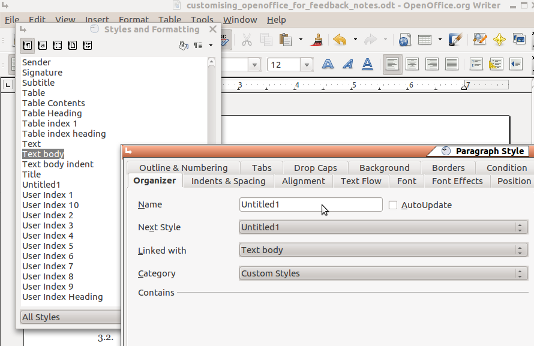
Preparing a template can be as simple as writing what you want and choosing File → Templates → Save. However, it is worth setting up some styles first. You may, for example, want to specify that subheadings are in the same font as the body text but in 14pt and bold. You can either set a new style by right-clicking on an existing style in the Styles and Formatting box and selecting New, then adjusting the font and paragraph attributes in the box that comes up (Figure 1), or block some text and use the New Style From Selection function (Figure 2).
If you are using a standard layout or aren't too fussy about details, you can always simply download templates that suit your purposes: there are essay templates for APA, MLA and Chicago styles at the bottom of this page.
In addition to paragraph styles, you can set character styles for the kind of highlighting or font effects described above, but I prefer to use macros for these.
Macros
Macros are sequences of actions which can be triggered with a toolbar button or a keyboard shortcut. As such, they are a boon to the tired teacher. As a case in point, I mark text that needs to be inserted into a student's work, like a missing preposition, in a bold, blue font with a dotted underline. Using the Format → Character dialogue, this would take nine mouse clicks; with a macro, it takes one. Setting up an array of macros to meet your marking needs takes time at the beginning but this is a fraction of the time it will save. Once created and saved in your feedback template, the macros will always be accessible via the toolbar and/or keyboard. However, if the instructions below sound daunting, you can just download the marking template from at the bottom of this page and use the macros provided there.
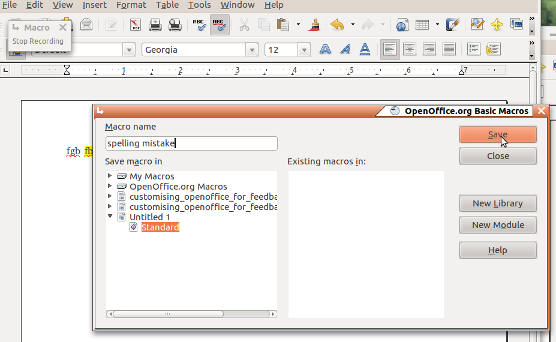 |
Almost all word processors now have a macro recorder. In LibreOffice, this is started using Tools → Macros → Record Macro. Once the macro recorder is running, anything you do in terms of keyboard strokes and mouse clicks is recorded, ready to be saved when you click the Stop Recording button. This can include both text and formatting (e.g., my students frequently miss out commas, so one of my macros inserts a comma with the formatting I mentioned for inserted text). Save your macro in the document you are working on (probably your feedback template) under Standard (Figure 3) and give it a name like "marking" when you are prompted to choose a new module. This means that any time you open your template, you will get the macros with it, but you won't get them when working on a different kind of document.
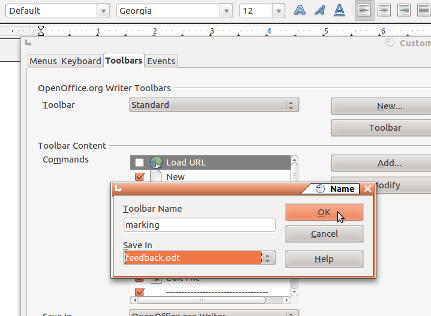 |
The next stage is to make the macro toolbar. Right-click on any toolbar, choose the Toolbars tab and click New, then give your new toolbar a name and save it in your template file using the drop-down menu (Figure 4). To create buttons for your macros, in the same dialogue click Add, then scroll down the list of commands until you find LibreOffice Macros: open it up with the arrow icon and you should find where your macros are stored (e.g. feedback.odt → Standard → marking). The macros you have created so far will appear on the right; click the one you want, then Add, or just drag it over. After clicking the final OK, you will see the names of the macros appear on the toolbar. If you want the name on the toolbar to be different from the name of the macro (e.g. just "sp" instead of "spelling_mistake") then from the same dialogue choose Modify → Rename. (You can also choose icons if you prefer, but of course that would mean finding or making suitable icons.) Finally, don't forget to save the template.
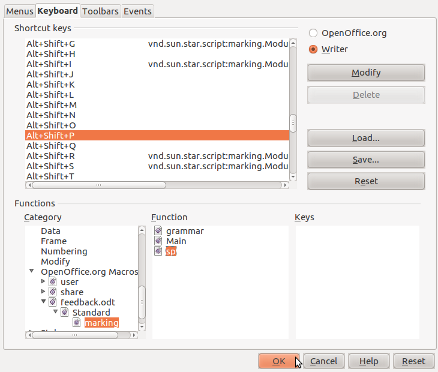 |
If your hands tend to be on the keyboard more than the mouse, you should also assign keyboard shortcuts to your macros. Go again to Tools → Customize, but choose the Keyboard tab. You will see a list of LibreOffice's shortcuts: pick one that is currently unassigned, then in the Category and Function boxes, choose your macro as you did when assigning a toolbar button (Figure 5).
Autotext
As teachers, we often find ourselves writing the same things on many student papers: "This is not clear," "This is a non-defining relative clause," "Please use the spell-checker" and so on. Autotext, as the name suggests, automates this process. Autotext can be accessed through the menus (Edit → Autotext) but this is tedious; it is far better to add an autotext button to an existing toolbar (right-click on the toolbar you want and select Customize Toolbar, then use the Add as before; the autotext button is under Edit). Clicking the down-arrow on the right of the button pops out a menu with the available autotext. At the moment, this will be largely geared towards business correspondence, so we need to create our own, which will appear in the currently empty My Autotext. The best way to do this is to build it up over a period of time; whenever you find yourself writing something that you have written a few times before (e.g. "You need the Present Perfect tense here"), block it, click the autotext button, give it a name (e.g. Present Perfect), then select New from the Autotext drop-down menu on the right. This will save the text with any formatting (useful if you highlight your comments rather than inserting them into comment boxes); if you don't want this, then choose New (text only).
Like macros, autotext can be accessed through the keyboard. When you name your autotext, LibreOffice will automatically select a sequence of keys based on it; for example, Present Perfect would be PP. Typing these letters followed by F3 inserts the associated text.
In this way, as time goes by, you will build up a repertoire of autotext to suit your needs. Unlike macros, autotext is not stored with document templates but in the main LibreOffice program, so if you want to use your autotext on a different computer, you will need to add a path to the file there: go to Options then Paths .
Downloads
Template for giving online feedback on student work.
This file contains macros, so you need to have your macro security setting at "Medium" and click "Enable macros" when prompted.